This post has been a long time coming - and may just be the most requested post of all time, but I am finally sharing our kitchen renovation with you - from the very beginning right through to our shiny new kitchen!
But before we can get into the new, we've got to start with the old.... and when I was writing this post and putting it together, I realised that I really needed to break it into two parts before I broke your computers with an overload of photos and videos.
The construction began the day we had our fridge delivered - cupboards removed just to make room.
When we purchased our house, we purchased it knowing we were going to change the kitchen..... actually, we purchased it knowing we were going to change both kitchens, because our house actually had two kitchens.
The couple we bought the home off lived with the wife's mother for many years and this was her childhood home. Mum lived downstairs whilst they lived upstairs - so they had two completely separate kitchens and living spaces so they'd all have their own space.
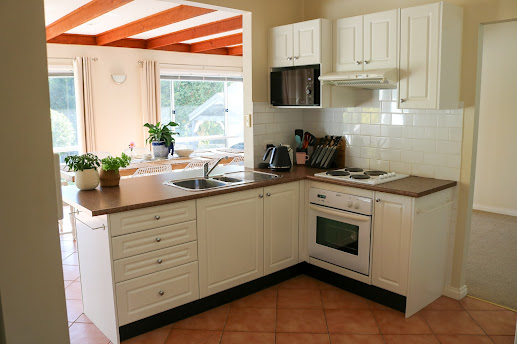
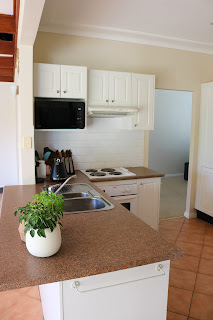
No prep space, no dishwasher and cabinets and tiles that were falling apart.
The kitchen had been updated over the years, but it just wasn't practical.
Cupboards you couldn't access, no bench space and everything was so short. Within a week of moving into the house, I'd bumped my head on the rangehood cooking dinner no less than 10 times - and I'd set the incorrectly placed smoke detector off by making toast, melting butter for cookies and turning on the oven.
If Satan had an oven, this would probably be it....
.... and the first time I used the oven? I quickly realised something was up.
Set to 180C/355F, I opened the oven door and almost burnt off my eyebrows and eyelashes.
I said to Jesse that I felt like it was much hotter than the temperature dial, but decided I'd put the frittata I was baking in anyway and within 5 minutes it was black.
A trip to the shops for an oven thermometer told me that 180C on our oven was indeed 240C.... a bit of a difference from the temperature I wanted 😳
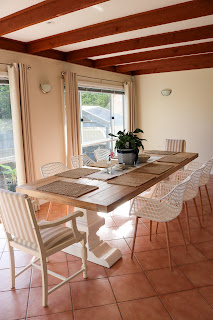
The dining room was perfect, but the kitchen left much to be desired
We also had no dishwasher, no room for appliances or my plethora of dishes and as someone who spends so much time in the kitchen, renovating the kitchen was moved to the front of my list.
We had a huge dining space and a separate dining space just off the kitchen, so I knew I wanted to open the walls up to make the kitchen space larger.
At first I wasn't sure exactly how I was going to design the kitchen. We thought about incorporating a butler's pantry and moving the plumbing - but ultimately I wanted the kitchen to look out onto the backyard - and I wanted a kitchen that would have plenty of space for entertaining.
The kitchen planning began - with mood boards and painters tape lines across the floor
By January, I was meeting with at least one kitchen company a week.
I knew exactly what I wanted, but I didn't know who I wanted to work with - and I needed to get some quotes.
I quickly found that whilst every kitchen company was giving me quotes for the exact same kitchen design (and materials), their prices varied wildly.
From $15K right through to $55K just for the kitchen cabinetry - and this is why I tell EVERYONE to get multiple quotes when you're renovating.
Even if someone is giving you a quote for the same dimensions and materials, the cost and inclusions vary wildly.
With the oven and stovetop moved to the upstairs kitchen, it was time for the demolition to begin!
But knowing that we had structural work that needed to be done, we chose to go with Kerrarn Builders. Luke and his Dad actually did my parent's second story renovation 20 years earlier so we knew and trusted them and I felt comfortable knowing they were in charge of the project.
Walls needed to come down, structural supports needed to go in and we needed someone that could coordinate all of the different trades.
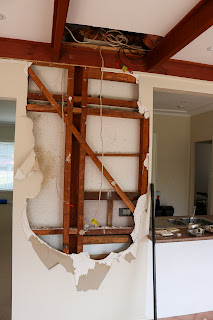
The first step of the kitchen renovation was to rip out the old kitchen and start taking down the walls.
Choose your weapon: 60's florals or 70's Asian chic
Taking out the kitchen revealed a bit of a window into the past with different layers of old wallpapers hidden behind the cabinets.
Taking down the walls revealed termite damage - and a need for support beams
At first, it seemed like we might get lucky and not need any structural supports - but it quickly became clear that with a 7m wide kitchen, the structural steel beams that were already in the ceiling just weren't going to do the job - and there was no way to replace them easily or without serious cost (or machinery) so I had to get creative.
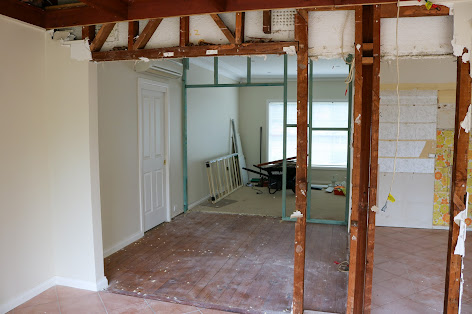
The old walls came down and the new wall was added in
I knew I wanted a large island in the centre of the kitchen, so I decided we'd incorporate the structural beams into the kitchen by adding not one support beam, but two.
This way the beams would frame the island and the kitchen behind and look like they belonged.
To maximise the kitchen space, we also closed in the original lounge room (which was open to the small dining room off the kitchen) so we could have cabinets running all the way across.
I wanted the kitchen and living room to still have an open plan feel though, so I decided to have a cavity slider door put in between the kitchen and living room so we could easily walk between the rooms.
The opening on the left was the original kitchen entry with the new door allowing you to walk straight in
We also changed the entry into the kitchen to make it feel like less of a maze and more of an open and inviting space.
Ready to take up those tiles!
Once the builders had taken out the kitchen, torn apart the walls and put in the framing for the new walls, it was time for Jesse and I to get started.
Knowing that we had original wood floors underneath the cracked and broken terracotta look tiles throughout the house, we decided we would take up all of the tiles and have the floors sanded back and restored.
Some tiles came up in pieces, some tiles came up one by one and others came up in slabs
This meant we had 100 sqm of tiles to rip up by hand... just the two of us....
But what many people don't know about us is that we love a challenge and love a project - so we got to work.
Sharpie markings and missing floor boards
Over a few weekends, we increased the noise pollution in our neighbourhood and took up every last tile, board and nail from the downstairs with just a couple of hammers and crowbars.
But with all of the tiles up and the floorboards restored, it was obvious that there was quite a lot of repairs to be done.
Nothing like a surprise find!
Along the way we'd found a random concrete slab where an old fireplace used to be, old lino backing, missing or replaced boards where walls were moved over time and we had complete holes where the walls previously were.
Three different types of floor coatings and one problem!
Not only that, we had to make new holes because we needed to be able to get the thick structural steel beams into the house, secured to the foundation below and welded to the existing steel beam.
Just one of the reasons I have grey hairs 😂
Let's just say, it's a bit stressful to see sparks flying around your house where you've just exposed old timber flooring that could have been coated with something extremely flammable 😅
New patched boards and random pieces of wood stopping tradies from walking on the loose beams
Luckily our floor sander was up for the challenge with this old house and called in his flooring layers to replace the damaged and missing boards with new ones.
Because our house had been renovated a few times over the years, this proved to be a little bit of a challenge as the floor wasn't perfectly even (as no old wood floor ever is) and boards changed width from room to room - but the holes were patched and we were one step closer.
Even the first sand was looking promising!
The next step was the sanding and we left this to the professionals.
Jayson sanded back the floors over a number of days and we were starting to get hopeful! The mismatched tatty looking boards were starting to look really good - even with just the first sand done.
Making progress - but the dust was unreal!
By the third day of sanding, Jesse and I packed up and went to stay with my parents to escape the dust and get out of Jayson's way.
Once the floors were sanded, it was time for them to be sealed. We ended up going with an older style polyurethane coating because we wanted the honey colour and traditional look, rather than a modern lime washed coating.
From the sanding stage to our first peek at the first coat through the windows!
This was for two reasons. The first was that we were mixing old boards with new and a darker finish would help to cover the imperfections. The second is that we live in our house. We want people to feel comfortable wearing shoes in the house, moving their chairs out and we were going to have kids in the house that would scrape toys across the floor or pets that would be running around.
It was important that we chose a finish that was hard wearing and easy to maintain.
The floors were done, but we had a long way to go!
And now that it's all finished, we definitely made the right choice.
The imperfect floors have added character and warmth to the house. Sure there's creaky boards here and there and places where cracks are evident - but with a brand new kitchen and brand new furniture pieces throughout, the imperfections are the perfect balance.
With the floors done, it was time for the kitchen to be installed... but there was delay after delay after delay.
And then we found there was another little person living in our house.
In the midst of all the kitchen dramas, I found out I was pregnant and I started getting very, very sick.
Thankfully my parents are rockstars and came to manage the tradies whilst I developed a close relationship with the bathroom upstairs.
A non pregnant and morning sickness free Jesse was very excited, but his wife was not!
Whilst I was busy puking, they made sure everything was fine with the kitchen - and very carefully broke one piece of bad news after the other to me.
The freshly finished floors had been scratched by the kitchen people.
The brand new fridge that we had so carefully moved in and out of the kitchen so many times now had two giant dents.
The kitchen cabinetry had been delayed.
The kitchen cabinetry had been sprayed wrong when it was delivered and needed to be sent back.
The stone I had planned all along wasn't going to work because they'd made a mistake and the slab didn't come as large as we needed.
I was starting to feel like we'd made a huge mistake and my stress levels were through the roof.
The kitchen cabinets were in, but there was still lots to do
The kitchen install process seemed to drag on for weeks - but it was finally installed and whilst, to be completely honest, I was still feeling pretty blah about the whole process, I was glad to have the cabinets in.
How many tradies does it take to install a kitchen bench?
Next the stone needed to be installed so the plumber could install the sink and stovetop.
With a 3.1 metre by 1.1 metre island, I knew the stone would be seriously heavy - and never had I been more nervous than I was whilst watching it be installed.
Every tradie that was in our house that day had to help out to carry the stone inside and put it in place.
Knowing the measurements had to be exactly spot on to fit between the two columns, I held by breath as they moved it into position.
And finally something went right because it actually fit.
With the kitchen finally installed, it was time to start making it look more like a home.
Rooms finally started looking more like rooms and less like construction zones
We had an awesome gyprocker who patched all of the walls, added new cornices to the kitchen, patched the living room cornice and fixed the many holes that had appeared over the course of the build.
Slowly slowly it started looking more like a finished space. The new cornices were up and it was time to put on the new skirting boards so the painter could come.
Ross the plumber saves the day!
But as our builder reminded me many times, our house is apparently cursed because in the middle of putting up the skirting boards, we discovered the plumbing for our granny bathroom is actually outside the bathroom and the nail gun went straight into the pipe.
A quick call to our incredible plumber had him making the one hour trip on a Saturday to rescue us and the leak was quickly fixed and we were back on track.
Tiles in, stovetop fitted - let the final steps begin!
After a few days of painting, the walls were finished, the tiles were in, the appliances were in and we were ready to have everything wired up.
So close! Furniture in and electrical work to be finished!
Next, my family all came over for one final kitchen working bee and we moved all of the furniture back into the kitchen, dining room and living room so we could start making our house feel more like a home.
With cables dangling from the ceiling, the final step of the renovations was to have the pendant lights installed and all of the furniture moved back into the kitchen and then we were done!
Late night pendant decisions
The pendants finally arrived and we decided on the height and then our poor electrician Harry had the difficult job of trying to make them even (an absolute nightmare!).
The pendants went up and down like yoyos as we tried to get them even
We also swapped all of the old, dull halogen lights for bright new LED ones and the pendants were finally in!
And whilst I've found so many imperfections with the kitchen (scratches and dents and chips on doors and cabinets that I never noticed when doing the final check because I was too busy rushing through things to go and puke 😅), we have managed to make it into a space we love using and can't wait to finally enjoy with our friends and family when restrictions end.
After all that hard work, it was time to rest!
It's definitely been one of the most stressful projects we've ever worked on, but I'm glad we did it because I pretty much live in our kitchen/dining room now - and I can't wait for lockdown to end so I can buy the final pieces that will finally finish the space.
But don't worry, the big reveal with all of the details will be posted THIS WEDNESDAY - so you've only got a day or so to wait!
This post may contain affiliate links. As an Amazon Associate I earn from qualifying purchases.









I love this! You're so lucky to have that floor. We have hateful tiles but just concrete underneath and I don't know what to do. We put in a new kitchen last Christmas and had the exact same problem with the super-expensive stone tops being cut wrongly. They finished installing with the 2nd attempt at the stone tops about 5pm on Christmas Eve. You can imagine how much fun that was. And weeks of no cooking facilities, washing up in the bath, cooking on the BBQ. We renovated and sold for profit 2 homes in London around the time our kids were born. Hard work but very lucrative. Here in Australia there's just no scope to do that. Just depressing tiles.
ReplyDeleteIt was definitely such a great find! It has it's downsides because the kitchen is actually a bit sloped (the cupboards are all even but the floors are a little bit like a ski ramp haha) but it's worth it!
DeleteEeeek! A Christmas Eve finish sounds so stressful! I don't know how I would have coped if we didn't have our upstairs kitchen. At times it frustrated me because it wasn't a proper kitchen (just cabinets and the old oven and cooktop from the original kitchen sitting in place) but we were so glad to still be able to cook!
Boooo to depressing tiles!!