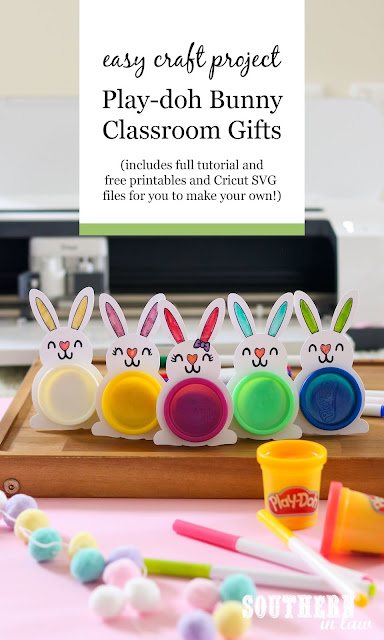
Chocolate free Easter gifts are made easy with this budget friendly Play-Doh Tummy Bunny Classroom Gift Project. Tutorial includes free printables and Cricut SVG files to make your own. All you will need is cardstock, markers and some playdoh or small gifts. A kid friendly craft project!
Easter is fast approaching and whilst my kitchen is demolished, my house is a mess and I'm starting to wonder if my neighbours are going to hate me for all of the construction noise, I wanted to take a minute to put together a super easy Easter craft for you.
So easy, in fact, that whilst the builders were working downstairs, I grabbed some cardboard, markers, playdoh and my Cricut and put these together in half an hour.
Don't have a Cricut? No problem! I've put together a printable for you that you can print and cut yourself.
How to make your Playdoh Bunny Gifts
First, you're going to need the files!
If you're using a Cricut or Silhouette, here is a free SVG cut file.
If you're printing and cutting these yourself, here are some print and cut files.
As for materials, you will need:
- Cardboard/cardstock (I used large sheets from the local newsagent)
- PlayDoh or a gift to add to the centre, such as:
- EOS Lipbalm
- Easter Stamps
- Easter eggs that you can attach with double sided tape
- Markers, crayons or coloured pencils to colour in the bunnies
- A Cricut or Scissors to cut your bunnies (I used my Cricut Maker)
- A ruler to measure your gifts
To print and cut your bunnies, simply print the template in the size you want on cardboard and cut out. Then attach your gift and you're good to go!
To use your Cricut, upload your free SVG cut file and follow the below instructions.
Step One: Upload your free SVG cut file to Cricut Design space.
On the layer panel on the right hand side, highlight the bunny layer and select "ungroup".
Step Two: Change the colour of the different pieces so you can easily see to layer them. At this point, I also attach the two inner ears and attach the face details so they move in one piece.
If you want to cut your face details out of cardstock or vinyl, you can skip to resizing and slicing out the hole from here.
Step Three: If you want to colour in the bunnies like I have, select the ear pieces and face details and select "pen" under draw on the operation drop down list. If you want to use different colour pens, be sure to select the colour for each section.
Step Four: You're ready to resize and cut out your hole.
By default, your Cricut will be set to inches, but you can change this to centimetres by selecting the three horizontal lines on the top left and then selecting Settings > Units > Metric.
Step Five: To work out the size of your hole, grab a ruler and measure the width of your item. For Playdoh tubs, I take off the lid and measure the inside of the container and then take off a few milimetres.
You can see that the measurement here is about 4.9cm so I made the hole 4.5cm for the container to fit snuggly.
This may take a bit of trial and error, but don't worry! Print a few test bunnies on paper so you can get the perfect measurement before cutting your cardboard.
Step Six: Make the circle your desired size and place on top of your bunny, resizing the bunny if needed to fit the circle.
Once you've done that, select the body shape and circle by selecting the body on the layer panel on the right and then holding shift and clicking the circle. When both of these are highlighted, click the "slice" button to cut out the circle.
Step Seven: Delete the two circles on the layer panel and then select all of your layers. Once all of your layers are selected, click "Attach" and you're readty to cut!
If you want to cut more than one bunny at a time, simply click your attached bunny and copy and paste to get the amount of bunnies you need for your project.
Step Eight: You'll need to insert your Cricut pen into the B Clamp and select "light cardstock" for the material.
Then place your cardstock onto your mat, load your mat and cut!
Step Nine: Once your bunnies are cut, it's time to decorate them! Grab the kids, pull out the pencils, crayons and markers and get creative!
Give them eyelashes, bows, sparkles or whatever you feel like!
Step Ten: Once decorated, you're ready to place your PlayDoh or chosen gift inside and you're all set to gift your bunnies!
And there you have it! The perfect chocolate free Easter gift that would make a great classroom gift or party favour. You could even use them as place settings for the kids table at your Easter festivities - just write their names on the ear or tummy!
What are you hoping the Easter bunny leaves you this year?
This post may contain affiliate links. As an Amazon Associate I earn from qualifying purchases.


No comments:
Post a Comment
There is nothing better than reading your comments on our posts! Let us know what you think of this post!